


Below, technical experts from EMCC break down a comprehensive, systematic guide across four critical areas: daily inspections, periodic maintenance, common troubleshooting, and long-term shutdown care.
🔍 1. Daily Inspections: Prevent Problems Before They Start (Every Shift)
This is the simplest yet most effective form of preventative maintenance. Operators should use the “Listen, See, Touch, and Check” method before, during, and after every single shift.
| Inspection Item | Standard / Normal Status | Abnormal Warning Signals to Watch For |
| Listen: Machine Sound | Smooth, rhythmic humming with zero foreign noise. | Sharp squealing (lack of bearing oil), dull heavy thuds (loose parts/debris), or periodic clicking (gear or scraper blade issues). |
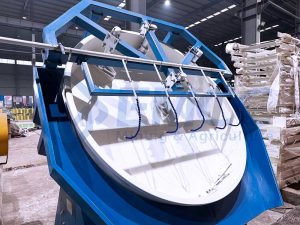
| See: Disc Rotation | Stable rotation; no visible wobbling, jumping, or eccentricity. | Obvious wobbling or hopping of the pan; abnormal material movement paths inside the disc. |
| See: Scraper Blade | Even gap between blade and pan bottom/edge; flush alignment without hovering or jammed tension. | Violent shaking of the scraper, excessively large gaps causing heavy material buildup, or heavily worn/broken blades. |
| Touch: Bearing Housing | Warm to the touch but not hot (generally below 60–70°C / 140–158°F). Use the back of your hand. | Scalding hot (unable to keep hand on it), pointing to lack of lubrication or internal bearing damage. |
| Check: Spray System | Excellent nozzle atomization; uniform umbrella or cone-shaped mist without dripping or clogging. | Straight water jet stream (poor atomization), dry nozzles with zero output, or leaking pipe joints. |
| Check: Bolt Tightness | Foundation bolts, scraper assembly bolts, and drive connection bolts are completely tight. | Rust streaks running down from bolts, or visible loosening when checked with a wrench. |
🛠️ 2. Periodic Maintenance Schedule
To maximize the lifespan of your pan granulator, deeper preventative maintenance schedules must be strictly followed alongside daily shift checks.
Weekly Maintenance
- Lubrication: Lubricate the adjusting screw rods of the scraper bracket and all grease nipples according to the required grease specifications.
- Cleaning: Thoroughly clean caked-on material buildup from the pan surface, scraper assembly, and overflow discharge rim.
- Drive Belt Check: Check the tension and wear status of the transmission V-belts (if applicable).
Monthly Maintenance
- Deep Bearing Lubrication: Inject specialized high-temperature grease (such as molybdenum disulfide lithium-based grease) into the main shaft bearing using a grease gun. Crucial tip: Slowly rotate the disc by hand while injecting to ensure uniform grease distribution.
- Scraper Precision Inspection: Measure the gap between the scraper blade and the disc bottom/edges. Keeping this gap at 1–2 mm is ideal. Worn blades must be adjusted or replaced immediately.
- Nozzle Deep Clean: Remove the spray nozzles and soak them in a diluted acid or specialized cleaning agent to dissolve internal limescale and binder blockages.
Quarterly / Semi-Annual Maintenance
- Gearbox Oil Flush: Check the oil level and quality of the main reducer. Replenish or replace entirely if needed. (Rule of thumb: Change oil after the first 500 hours of initial operation, then every 2,000–3,000 hours or every six months).
- Electrical Systems: Tighten all wiring terminals, test motor insulation resistance, and blow out dust from the control cabinet.
- Structural Inspection: Inspect the disc body and frame welds for any microscopic cracking, structural fatigue, or deformation.
Annual Overhaul
- Bearing Replacement: Implement scheduled replacement of the main shaft bearings based on overall operational runtime.
- Gear & Reducer Inspection: Open the gear cover to check the gear mesh wear patterns, flush out oil sludge from the bottom of the casing, and completely replace the gear oil.
- Pan Surface Restoration: Check the wear condition of the anti-stick pan lining. Re-spray Teflon coatings or install new lining plates where necessary. If the surface deformation is severe, reshaping and repair are required.
⚙️ 3. Quick Troubleshooting Guide for Common Faults
When issues arise on the production line, use the below guides for quick diagnosis and repair.
1. Low Pelletization Rate & Excess Fine Powder
- Potential Causes: Improper moisture control (too much or too little water); incorrect disc inclination angle or RPM; raw material fineness is insufficient.
- Solutions: Take samples directly at the spray zone to micro-adjust water intake. Refer to “How to Prevent Material Sticking in Disc Granulators?”For highly cohesive materials, increase the pan angle/speed. Check your crusher screen to ensure raw materials pass a 40-mesh sieve.
2. Highly Uneven Pellet Sizes
- Potential Causes: Unstable material feeding rate; uneven spray distribution; scraper gap is too wide, causing periodic collapses of caked material.
- Solutions: Install a constant-flow feeder and monitor the ammeter to stabilize input. Remove and clean all clogged nozzles. Adjust the scraper gap back to 1–2 mm and clear out underlying buildup.
3. Severe Material Sticking to the Pan
- Potential Causes: Raw material is overly wet or inherently too sticky; anti-stick lining/coating has failed; scraper blade is worn down or with excessive clearance.
- Solutions: Control water input upstream or introduce loose additives. Repair or re-apply Teflon/polyurethane coatings. Adjust or replace the scraper blade immediately—this is the most effective solution.
4. Excessive Disc Wobbling or Shaking
- Potential Causes: Loose anchor/foundation bolts; severely worn main shaft bearing; loose connection between the disc base and the main shaft.
- Solutions: Shut down the machine immediately and tighten all foundation bolts. Use a dial indicator to test the radial runout of the main shaft; if it exceeds 0.3 mm, replace the bearing. Tighten connection bolts and reinforce with dowel pins if necessary.
5. Abnormal High Motor Current (Amps)
- Potential Causes: Overloading of materials in the pan (material jam); damaged bearings; voltage fluctuations in the power grid.
- Solutions: Stop feeding materials immediately, cut the spray system, and restart only after emptying the pan. If the bearing is broken, it will present with high heat and noise—replace it. If it is just grid fluctuation, wait for the voltage to stabilize.
6. Overheating Bearing Housing
- Potential Causes: Excess or insufficient grease volume; damaged bearing; newly replaced bearing was installed too tightly.
- Solutions: Check grease levels; fill the bearing chamber to only 1/3 to 1/2 of its total capacity. Replace with the exact matching bearing model if damaged. Re-verify tolerance fits and re-install correctly.
7. Broken or Rapidly Wearing Scraper Blades
- Potential Causes: Hard foreign bodies in the pan (e.g., tramp iron, loose bolts); scraper material is not wear-resistant; hard metal-to-metal contact with zero gap.
- Solutions: Clear out foreign materials and check your upstream magnetic iron separators. Switch to cemented carbide or wear-resistant ceramic scrapers. Always maintain a minimum 1 mm clearance gap.
🛑 4. Crucial Guidelines for Long-Term Shutdown Care
If your fertilizer production line is scheduled to step down for more than one week, you must protect your industrial granulator from corrosion and structural warping.
- Thorough Evacuation: Completely empty all materials inside the disc. Use high-pressure water jets or compressed air to wash down the pan surface, scraper blades, and brackets until there is zero residual buildup.
- Drain & Anti-Freeze: For winter shutdowns, completely drain the liquid spray system, water pumps, and pipelines to prevent freezing and cracking.
- Comprehensive Lubrication: Inject fresh grease into all lubrication points (bearings, screw rods, chains). This creates a critical moisture barrier on bare metal surfaces.
- Rust Prevention: Apply anti-rust oil or protective grease coatings to the disc surface, scrapers, and exposed machined metal faces. Cover the entire unit with a heavy-duty waterproof tarpaulin.
- Reducer Maintenance: Check the gear oil levels and ensure the breather cap is completely clean and clear of dust blocks.
- Electrical Protection: Disconnect the main power supply. If possible, remove precise internal components or circuit boards from the control cabinet and store them in a dry, ventilated environment. Secure onsite control panels against rain and pests.
💎 Summary & Safety Reminders
⚠️ Safety First: Any maintenance, cleaning, or troubleshooting must be performed under strict Lockout/Tagout (LOTO) conditions. The main power must be disconnected with a clear warning sign hanging on the switchboard: “DANGER: Personnel Working, Do Not Energize!” When calibrating the scraper blades, always rotate the disc manually by hand. Never use the motor drive to test adjustments.
- Prevention trumps cure: A strict daily inspection and periodic maintenance schedule will eliminate more than 90% of sudden, costly emergency production line shutdowns.
- Diagnose before dismantling: When faced with an issue, check the troubleshooting guides above first. Isolate problems from the simplest cause to the most complex. Avoid blind, immediate tear-downs.
Need deeper technical analytics for your specific model or a persistent granular output issue? Contact EMCC Technical Support today for expert guidance.